

Temporarily Pause Notifications or Alerts During Planned Downtime or Testing
When you’re tasked with routine maintenance updates or security scans on systems, the last thing you want is your automated monitoring system erupting with events and filling your inbox with unnecessary alerts. Rather than disabling them all together and potentially missing a real problem, ELM provides a few different options to silence these notifications so you can get your work done and be on your way. In this article we’ll take a look at Notification Thresholds as well as Maintenance Categories.
Thresholds for Notification Methods
Thresholds determine how many times identical events can occur before a Notification Method will be executed, or stopped from executing. It is important to identify what increments the event counter. For example consider this sequence of events.
| Event | Source | Event | Message |
|---|---|---|---|
| 192.168.1.15 | ImageWriter | 7 | Printer Out of Paper |
| 192.168.1.15 | ImageWriter | 7 | Printer Out of Paper |
| 192.168.1.15 | ImageWriter | 7 | Printer Out of Paper |
| 192.168.1.15 | ImageWriter | 7 | Printer Out of Paper |
| 192.168.1.15 | ImageWriter | 7 | Printer Out of Paper |
| 192.168.1.15 | ImageWriter | 7 | Printer Out of Paper |
| Exchg-AFX-2019 | EEMSVR | 5506 | Ping failure. System Down. |
| 192.168.1.15 | ImageWriter | 7 | Printer Out of Paper |
Most likely you don’t want that ping failure suppressed along with a bunch of chatty printer messages. ELM handles this by incrementing only for identical events; that is, events that have the same four fields.
- Computer Name
- Source
- User Name
- Event ID
There are three main threshold settings available for Notification Medods: Disable, Activate, and Consolidate, along with a fourth option to hold notifications for older events that may have been cached. You access these by viewing the Properties, and Threshold tab of any Notification Method.

- The first threshold setting will allow you to receive the first few notifications that occur within the specified time period, then disable the notification for a set period before automatically re-enabling it again. This basically allows you to get the first few messages that you specify you want, then staggers the messages or creates a “sleep period” giving you time to take corrective actions to fix the problem.
- This setting option allows you to activate the notification method only after it is triggered a specific number of times within a specified time period. By default this is set to activate after occurring just one time. When this threshold is selected, the notifications will not be processed unless the rule is triggered the specified number of times within the time period selected. For example, if you set this to activate only after being triggered 3 times within 10 seconds for a logon failure, then you’ll get notified for one out of every three times that a logon failure occurs within 10 seconds.
- This option can be used to consolidate notifications for barrage or “event storm” protection. If you are expecting potentially hundreds of messages in a short amount of time, for example during a routine Security Scan/Test, then this is a good option to use. It can be set to a specified number of similar events that occur or to a designated amount of time passing.
- The final option within threshold settings is to disable this notification method for all Cached (old) data sent from a Service Agent. By default, 60 minutes is the window of time differentiating old data from new data. If an event occurred within the last hour, even though it may be from a Service Agent cache file, ELM will not treat it as (old) cached data. This feature is designed to account for and notify you of events that occur during a brief ELM Server outage such as a reboot, service restart, etc. The 60 minute window of time can be changed in the CacheDataTrigger value in the Registry on the ELM Server.
Modifying your threshold settings within the various notification methods helps you to fine tune the information you are receiving from ELM and can help to narrow down the number of notifications you receive that you may not need or want. Next we’ll take a look at Maintenance Categories.
Maintenance Categories
Whether you are in charge of 15 systems or 150, preventive maintenance in the form of updates, upgrades and scans or testing is a way of life. Quite often these tests and updates have to take place in off hours when business is closed or low activity. This planned downtime has commonly been referred to as a “maintenance window.” Whether you have a defined schedule or take it as it comes, it does require pre-planning and occasionally some unusual hours.
Part of that planning should involve pausing your notifications and alerts so that you don’t go crazy with a bunch of false positives for problems or errors that aren’t really problems or errors. ELM provides Maintenance Categories, similar to Monitoring Categories, designed to temporarily disable any notifications from the systems that are assigned to these categories. That doesn’t mean that monitoring systems of those systems stops during the maintenance periods, they just keep you from potentially being barraged with notifications during reboots, scans, etc. Here’s how it works.
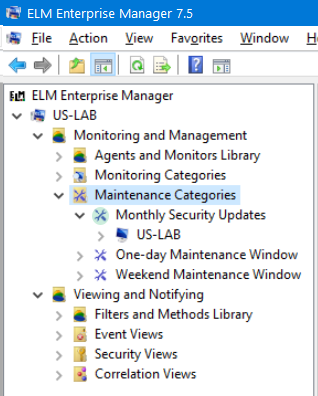
We’ll take a look at one of the three default Maintenance Categories in ELM, the Monthly Security Updates category. We’ll start with right-clicking the category from within the ELM Console, then select Properties, and navigate to the Maintenance tab.

This is where we can define the maintenance window schedule including the time, duration and recurrence pattern.
Starting at 6AM, for two hours, the second Tuesday of every month, and recurring monthly, all systems assigned to this category will not trigger any notifications, providing a two hour window for patches, updates, scans, and whatever other work is needed. You can adjust and fine tune the recurrence as needed, similar to a calendar event in Microsoft Outlook.
Next we’ll toggle back to the Agents tab.

Here is where you can assign agents to this Maintenance Category. The dialog box will show all available Agents that can be assigned to this category. In this example we’ve only selected our US-Lab System. We can add any or all systems to this Maintenance Category and clicking OK will assign them.
Now every second Tuesday of each month, all notifications for these systems will be temporarily disabled for 2 hours (6AM to 8AM) while you or your team updates, patches, runs scans, and reboots as necessary.
 While Maintenance Categories are active, as well as the systems within them, their icons will change within some areas of the ELM Console so that you know what’s in maintenance mode without having to look at properties. The Maintenance Category Icon will glow green in the left pane as well as any systems within that category in the right pane. There is also a tooltip text next to each Agent in the left pane of the console showing that it is in “MAINTENANCE” mode regardless of what other Agent Categories it may be assigned to.
On a final note, when deploying new agents onto your systems, if you choose the Advanced path within the deployment wizard (about step 3 in the process), you have the option to assign the new agents to Maintenance Categories from the very beginning.
We hope that you found this article on how to Temporarily Pause Notifications or Alerts During Planned Downtime or Testing informative and useful and wish you continued success with ELM.